Goat Cheesecake with Spiced Grapes

by Catherine Down


I might be only person who could possibly create a cake out of a salad cookbook, but given that Patricia Wells’ new cookbook Salad as a Meal came out in stores yesterday, baking a cake seemed like a celebratory thing to do. 

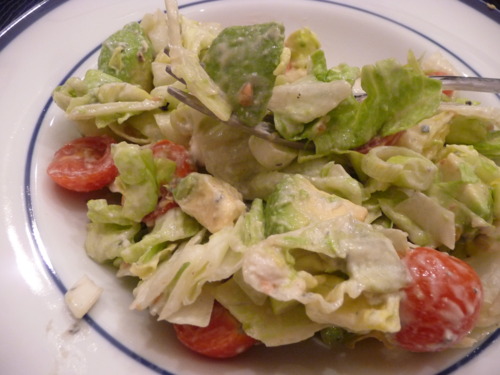
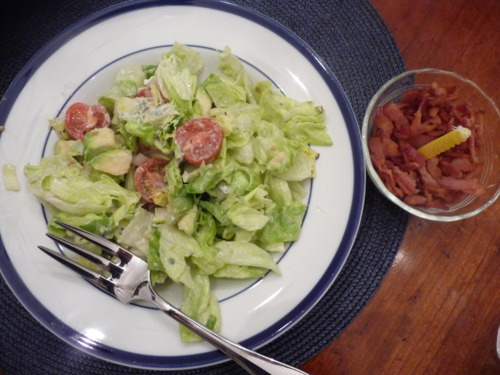
For the past two weeks, I’ve been participating in the Salad as a Meal Challenge and blogging about recipes from the cookbook. And while it’s been fun, I asked myself how could I make this even more challenging? Or more specifically, how do I take a cookbook focused on fresh, healthy meals and make something decadent and over the top?

The answer: take a recipe for spiced grapes destined for a cheese plate and use it to top cheese…cake. Goat cheesecake. 

goatcheesecake.jpg

I made the grapes about a week ago and they’d been pickling in the fridge ever since. The honey and vinegar blend flavored with peppercorns and spices resulted in a complex, sweet and sour syrup that was a beautiful accompaniment to a sophisticated cheesecake. For the spiced grapes, you’ll need to get your hands on the cookbook, but for the goat cheesecake simply scroll below. It’s lovely on it’s own. 

Goat Cheesecake

Ingredients:

18 graham crackers (approximately 2 1/2 cups crushed- digestive biscuits would also work nicely) 

6 tbs melted butter

2 tbs sugar 

16 oz. cream cheese (In Paris, I substitute St. Moret) 

8 oz fresh goat cheese 

3/4 cup sugar 

2 tsps good vanilla extract

3 large eggs, room temp 

Steps:

1. Preheat the oven to 350 degrees fahrenheit. Grease a 9 inch springform pan and wrap the outside tightly with aluminum foil.

2. Melt 6 tbs of butter and set aside. In a food processor, pulverize the graham crackers into fine crumbs. Pour the crumbs (approximately 2.5 cups) into a medium sized bowl. Stir in the 2 tbs of sugar and then mix the melted butter until thoroughly integrated. 

3. Pour the crumbs into the spring form pan and press to form an even layer on the bottom and then continue to press along the remaining crumbs along the side walls of the springform pan. This recipe makes ALOT of crust so don’t be alarmed at how high up the crumbs go.  

4. Bake the crust for approximately 10 minutes at 350 degrees F so that it darkens and crisps up a little. Turn the oven down to 325 degrees F. Set the crust aside to cool while you make the filling. 

5. In the large bowl of a stand mixer fitted with a paddle attachment, beat the cream cheese, goat cheese, sugar and vanilla extract together for a minute or two until thoroughly mixed. The mixture should be fluffy and slightly resemble buttercream frosting. 

6. Add each of the 3 eggs one at a time, beating well after each addition and scraping down the sides of the bowl. When properly mixed, it should resemble a large bowl of vanilla pudding. 

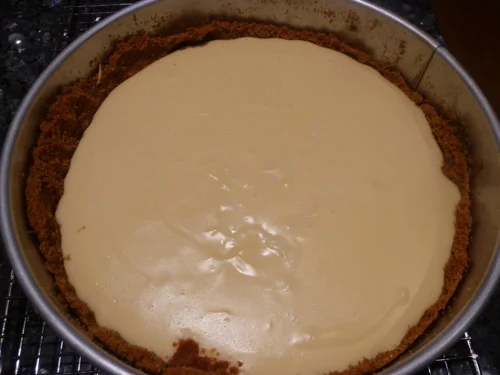
7. Spoon immediately into the parbaked crust. It’s really key that if you haven’t already, you wrap the springfoil pan tightly with aluminum foil as it keeps the water from leaking in. Take a large roasting pan and place the springform pan in it. Fill the roasting pan with water until it’s about halfway up the side of the springform pan. Bake at 325 degrees fahrenheit for 45 minutes. The cheesecake should still be slightly wobbly in the center when you remove it. 

8. Very, very carefully remove the waterbath from the oven and try not to spill almost boiling water all over yourself. Remove the cheesecake from the waterbath and allow to cool in the springform pan on a rack. 

goat cheesecake.jpg

If the crust is higher than the filling just cut the extra off with a knife and eat it. 

9. When fully cooled, wrap in plastic wrap and chill in the fridge for at least 6 hours. When ready to serve, remove the cheesecake from the springform pan and place on a cakeplate.

Serve alone, topped with your favorite fruit compote, or as I did, with Spiced Grapes from Salad as a Meal. I poured a thin layer of the flavorful syrup over the top of my cheesecake, halved all of the pickled grapes and arranged them on top of the cheesecake. It was a messy, sticky operation but whole grapes rolling around the top of a cake seemed like a disaster. Don’t add the syrup and grapes until right before serving as the syrup will soak into the crust otherwise. 

The result is a not-too sweet, tangy cheesecake with lots of crust. Best salad ever. 

final goat cheese cake.jpg

Salad as a Meal Challenge: Patricia’s Cobb Salad with Birthday Bacon

by Catherine Down


cobb salad.jpg

After an epic journey through Italy and back to France that can only be described as special, I touched down in Boston this week just in time for my dad’s birthday. Stepped off the plane and I made…salad.

Cobb Salad to be specific, from Patricia Wells’ new cookbook Salad as a Meal. It was easy to throw together after 7 hours on a plane, healthy, made up mostly of pantry staples, and it included bacon. 

Bacon is the smell of celebration in the Down household. Every holiday morning begins with bacon for my family (minus me). Slim Jim, as we call my dad, is usually a very healthy eater so Cobb salad with a celebratory side of bacon seemed like the perfect meal. 

birthdaybacon.jpg

The perfect gift in his opinion were two 12 inch shoe horns made from real horns. It’s unclear to me why anyone would need one massive shoe horn, much less two, but the heart wants what it wants. And clearly, he was thrilled. 

No endangered animals were used in the making of these ridiculous shoehorns.

No endangered animals were used in the making of these ridiculous shoehorns.

Slim Jim might not be slim any longer after eating the nutmeg spice cake with rum buttercream that my sister made (3 sticks of butter in the frosting alone) but don’t blame me- I made salad! 

A few notes on the salad:

  • The dressing was a light lemon dressing that is so creamy that I was shocked at how healthy it is (just low-fat yogurt, lemon juice and salt). 
  • I did find the 4 oz. of Roquefort to be a bit overwhelming however, and I would probably cut down on the amount of cheese next time. 
  • Although the recipe calls for heirloom tomatoes, I used a cup of halved cherry tomatoes instead as they are far more flavorful and easier to find this time of year.  

My Cobb Salad: Iceberg, Tomato, Avocado, Bacon, and Blue Cheese

From Salad as Meal by Patricia Wells (with permission)

Robert H. Cobb, owner of the Brown Derby restaurant in Hollywood, is said to have invented this salad in the 1930s as a late-night snack for himself. No wonder it has remained an American classic. With the crunch of the iceberg and onions, the soft richness of the avocado, the saltiness of the bacon, the sweetness of the tomato, and the bite of the blue cheese, this salad has it all! And it is beautiful to boot.

4 SERVINGS

2 1/2 ounces smoked bacon, rind removed, cut into matchsticks (3/4 cup)

1 head iceberg lettuce, chopped (4 cups)

2 ripe heirloom tomatoes, cored, peeled, seeded, and chopped

1 large ripe avocado, halved, pitted, peeled, and cubed

4 ounces chilled blue cheese (preferably Roquefort), crumbled (1 cup)

4 small spring onions or scallions, white part only, trimmed, peeled, and cut into thin rounds

Yogurt and Lemon Dressing (See recipe below)

Coarse, freshly ground black pepper

1.In a large, dry skillet, brown the bacon over moderate heat until crisp and golden, about 5 minutes. With a slotted spoon, transfer the bacon to several layers of paper towels to absorb the fat. Blot the top of the bacon with several layers of paper towels to absorb any additional fat. Set aside.

2. In a large, shallow bowl, combine the bacon, lettuce, tomatoes, avocado, cheese, and spring onions. Toss with just enough dressing to lightly and evenly coat the ingredients. Season generously with pepper, and serve.

Yogurt and Lemon Dressing

Makes about 3/4 cup

1/2 cup plain low-fat yogurt

2 tablespoons freshly squeezed lemon juice

1/4 tsp Lemon Zest Salt or fine sea salt (see recipe below)

1. In a small jar with a lid, combine the yogurt, lemon juice and salt. Cover with th lid and shake to blend. Taste for seasoning. The dressing can be used immediately (Store the dressing in the refrigerator for up to 1 week. Shake to blend again before using.) 

Lemon Zest Salt 

1 tablespoon grated lemon zest, preferably organic

1 tablespoon fine sea salt 

1. Combine the lemon zest and salt in the spice grinder and grind to a fine powder. Transfer to a small jar and close with the lid. (Store sealed in the jar, in the refrigerator for up to 1 week. After that, the lemon flavor will begin to fade.) 


Salad as a Meal Challenge

by Catherine Down


“Have you ever actually eaten a salad as a meal?” My friend Paige asked me skeptically.

I can offer up a few previous entries from this blog as evidence (Exhibits AB, and C) that I have been known to eat a salad here or there, but she had a good point. For someone who has been a pescatarian for 14 years, I manage to eat very few vegetables. I tend to be a “Dessert as a Meal” kind of vegetarian. After this year of sheer gluttony in Italy and France however, I could do to incorporate more salads into my repertoire. Greens have never seemed so dreamy!

That’s why I’m so excited to announce that I’ll be participating in the Salad as a Meal Challenge for Patricia Wells’ new cookbook, Salad as a Meal. I and 8 other bloggers will be blogging about our experiences with the cookbook for 4 weeks. Check back here on Ciao Down or follow me on Twitter (catherinedown) from March 21rst-April 17th for info on how it’s coming along, recipes from the book, and even for a chance to win a copy yourself!


Whole Wheat Sesame Cornmeal Crackers

by Catherine Down


There’s so much to update you on:  the new harvest of extra virgin olive oil, a Slow Food conference, a field trip to Tuscany, the list goes on and on. That’s all coming at some point I promise but to tide you over in the meantime I want to share my favorite new hobby: baking crackers.

It’s an unusual hobby I realize. But we only have a month left of school here in Italy and massive amounts of polenta, sesame seeds and whole wheat flour in our pantry. Thus, cracker baking time. I like triscuits and wheat thins as much as the next person (maybe even a little bit more) but there’s something very thrilling about making your own crackers, even if they’re a bit rustic.

Whole Wheat Sesame Cornmeal Crackers

(Adapted from Food and Wine Magazine)

Ingredients:

2 cups whole wheat flour (In Italy, I use Petra. In the U.S., King Arthur whole wheat flour might be your best bet)

1 cup all purpose white flour (00 in Italy)

1 cup yellow cornmeal

¼ cup sesame seeds (plus maybe another ¼ cup for sprinkling on top)

1 tbs salt

¾  extra virgin olive oil

¾ plus 2 tbs water

Steps:


  • Pour in the ¾ cup of extra virgin olive oil and mix well until the consistency looks like wet sand. If it’s a little too dry, you can splash a tiny bit more olive oil in.
  • Add the water all at once and mix well. Turn the dough onto an unfloured surface and knead well (I knead in the bowl that I mixed it all in).
  • Preheat the oven to 375 degrees Fahrenheit (190 degrees C). Divide the dough into 4 pieces. On a surface lightly dusted with cornmeal, roll out 1 piece of dough 1/8 inch thick or so. A rolling pin is obviously best, but not necessary if you don’t have one. I used the bottom of a glass jar of honey. It created an uneven, rustic effect but it did the trick more or less. Keep the rest of the pieces wrapped.
  • Sprinkle a handful of sesame seeds over the dough and press them into the pastry with your rolling pin/jar/hands. Cut the pastry into 1 inch squares and transfer to ungreased baking sheets. Repeat with remaining dough and seeds.
  • Bake the crackers in the upper and lower thirds of the oven shifting the pans from top to bottom and front to back halfway through. Bake the crackers until crisp and golden (approximately 10-15 minutes depending on your oven). Let the crackers cool completely on the baking sheets.

Back in the Land of Shark Week and Air Conditioning

by Catherine Down


Back home briefly for summer break and all I can say is THANK GOD I made it back in time for Shark Week. Today I made a list of things I’m particularly appreciating about America:

1. air conditioning

2. cheddar cheese

3. my family and friends

4. mexican food

5. being able to wear exercise clothes in public

What needs to be added to that list? My mother’s food processor.

Creamy Gazpacho

Technique adapted from Cook’s Illustrated

This is so much better when the flavors have time to meld so I recommend making this the night beforehand

Ingredients:

5 large tomatoes with core removed (3 regular and 2 heirloom)

1/2 English cucumber (the long skinny cucumbers without seeds)

1 yellow bell pepper (seeds and ribs removed)

1/2 green bell pepper (seeds and ribs removed)

1/2 large red onion

1 serrano chile (sliced in half, seeds and ribs removed)

2 cloves of garlic finely minced

2 tbs kosher salt (plus more to taste)

1 piece of French baguette (approx. 4 inches long)

1 handful cilantro

1 handful parsley

1/2 cup extra virgin olive oil

2 tbs sherry vinegar

black pepper, to taste

Steps:


1. Coarsely chop all the veggies, the onion, and chile and place in a large mesh strainer set over a large bowl. Finely mince the garlic and place in a small fine mesh strainer. Rinse the garlic under cool water (this will remove some of the sulfurous taste of raw garlic) and drain. Toss with the veggie mixture. Mix in 2 tbs of kosher salt and let the veggies drain in the strainer over the bowl for at least an hour.*

2. Take a slice of stale French baguette (about 4 inches long) and tear into chunks. Soak for a minute in the juices that have collected in the bowl below the veggies.

3. Take half of the vegetables and place in the food processor. Pour half of the veggie juices and bread chunks in as well. Throw in the handful of cilantro. Start processing the mixture and slowly drizzle in a 1/4 cup of extra virgin olive oil so that the gazpacho emulsifies and looks creamy.

4. Pour the first batch of gazpacho into a large bowl. Take the other half of the veggies and bread/juice mixture and put in the food processor. Throw in a handful of flat leaf parsley. Start processing the mixture and slowly drizzle in 1/4 cup of extra virgin olive oil.

5. Mix the two batches together in one large bowl. Add 2 tbs of sherry vinegar and salt and pepper to taste.

6. Put in the fridge for at least 2 hours, but preferably overnight. Garnish with minced vegetables if you so desire and serve cold.

*This step is very important! Cook’s Illustrated writes that “for maximum flavor extraction, salting the vegetables and letting them sit for an hour works best. With time, the salt draws flavor compounds out of the cell walls while simultaneously forcing the proteins to separate from these molecules, producing a more intensely flavored soup. Simply seasoning the soup before serving will not have the same effect.”


Bowls Made of Cheese! And a little Salad too...

by Catherine Down


I live right outside Parma, the land of Parmigiano-Reggiano cheese. The cheese in the stores is sold in ENORMOUS hunks because no one can imagine making do with anything under a kilo. Awhile ago, my friend Kate brought a really great apple & arugula salad to dinner one night. It was simple and flavorful and just delightful in every way. I started mulling over that delicious combo and created my own slightly fancy Parma-riffic version served in mini salad bowls made of cheese. All bowls should be made of out cheese, and now that I’m thinking about it, plates too. 

Arugula, White Bean & Apple Salad in Parmesan Bowls

(Serves 2 if you each get two bowls, or 4 if you want small side dish/fancy first course portions)

Ingredients:

12 tbs grated parmigiano-reggiano (3 for each bowl)

1 1/2 cups arugula

1 cup mache (also known as valerianella or lambs lettuce)

1 yellow apple, washed

1/2 of a 15 oz. can of cannellini beans (drained and rinsed)

1 lemon

1/2 tsp lemon zest

1 1/2 tbs extra virgin olive oil

a pinch of salt and a pinch of pepper

Steps:

1. Pre-heat the oven to 350 degrees. Zest the lemon and set aside. Juice the lemon and put the juice in a large bowl. Mix in the 1/2 tsp of zest and salt and pepper to taste. Slowly whisk in the 1.5 tbs of olive oil. Stir in the white beans and let marinate for 30 minutes or so. This step adds a little extra flavor to the beans but it does tend to make them a little mushier so be careful when tossing the salad later. If you’re pinched for time, no worries you can always just dump the beans in and continue on without letting them marinate. Set the bowl aside.

2. Line up 4 large, clean glasses of the same size. Rip a sheet of parchment paper in half and place in a 9x13 baking pan. Put a mound of 3 tbs of grated parmigiano-reggiano cheese on each piece. Pat gently so that the cheese makes lacy circles. 

3. Bake in the oven for approximately 7-8 minutes until they are golden and crisp. It’s a good idea to keep an eye on them starting around the 5 minute mark.

4. Remove from oven and using a spatula and an oven mitt (the parchment and cheese are very hot) immediately place each cheese circle over the bottom of one of the cups and gently press to mold it into a bowl shape. Let cool and harden on top of the cups. Make the other two cups in the same way. 

5. Wash and dry 1 1/2 cups arugula and 1 cup mache. Core 1 yellow apple and cut into thin slices (you could even shave it if you wanted to get really fancy). Stir the greens and the apple slices into the bowl with the beans and lemon vinaigrette. Stir together gently to coat the greens but be careful not to squash the beans too much. 

6. Gently remove the parmesan cups from the drinking glasses and I suggest placing each one on the plate they will be served on in order to avoid breakage during transfer. Carefully fill each cup with salad and serve. 

Note: If you’re not allergic as I am, I would imagine that a few toasted pine nuts or slivered almonds on top would be awesome. I sprinkled a little extra grated cheese and lemon zest on top as garnish and it worked just fine as well.


Bus Ride to Belgium 3 Bean Salad

by Catherine Down


I’ll be getting up at 5:30 am tomorrow to spend approximately 18 hours on a bus headed to Belgium. In an effort to avoid eating rest stop food (although Autogrill deserves some credit for being shockingly good), I made a salad that I thought could withstand the travel. It’s filling, cheap, and healthy to boot. You could easily make one big batch at the beginning of the week and bring the leftovers to work everyday for lunch as the beans will just get more flavorful with time.

3 Bean Salad

Ingredients:

4 limes

1/4 cup extra virgin olive oil

½ tsp salt

¼ tsp black pepper

1 can black beans or ½ cup dried black beans

1 can chickpeas

1 can gidandes a.k.a. butter beans (or cannellini, or kidney, whatever you like best)

15 cherry tomatoes cut in half

2 stalks celery diced

3 tbs minced Parsley (some cilantro would be awesome but it’s quite difficult to find here)

½ cup chopped roasted red and/or yellow peppers (jarred or homemade)

½ cup chopped scallions (white and light green parts)

½ of a large can of sweet corn (this would be even better with fresh corn when it’s in season)

Tabasco sauce to taste (I used 25 dashes) or 1 finely minced jalapeno with the ribs and seeds removed (they don’t exist here so I had to resort to hot sauce)

3/4 cup crumbled feta cheese (optional)

Steps

  • Cut the cherry tomatoes in half, dice the 2 stalks of celery, finely mince the parsley (and/or cilantro), chop the 1/2 cup of scallions and the 1/2 cup roasted peppers. Drain the can of corn and rinse with water. Mix half in with the salad in a large bowl and save the other half for another use.
  • Gently stir in the beans and vinaigrette and toss until everything is coated. Add the chopped jalapeno or dashes of Tabasco sauce to give it a kick. Squeeze the juice of 1 lime on top to freshen up the citrus flavor. Add salt and black pepper to taste. Stir in the feta crumbles. Pack in a tupperware and head out to your bus ride/picnic/office/potluck.

Triple Apricot Moist Muffins

by Catherine Down


Asher’s birthday was last Monday and it happened to coincide with our class trip to Friuli. Given that it’s not so much fun to kick off your birthday at 6 am with a 4 hour bus ride, I decided to make a celebratory portable breakfast in his honor. Nothing screams breakfast like apricot yogurt, with fresh apricots, with apricot glaze. In cake form.

These yogurt cakes were supposed to be poundcake-like in texture but ended up being termed “moist muffins” by my classmates. It’s a term that lends itself easily to dirty jokes (I’ll leave it up to your imagination), but it’s undeniably spot on. Fact: they are muffin shaped and they are intensely moist.  I’d say they are just the thing for a 6 am bus ride but honestly they were too sticky to be 100% travel convenient.

Triple Apricot “Moist Muffins”

(Makes 12 jumbo muffins)

Ingredients:

300 grams (approx 1 cup plus 2 tbs) of whole milk apricot yogurt. If you can’t find apricot yogurt, plain whole milk yogurt flavored with a tbs or so of apricot jam also does the trick.

1/2 cup granulated white sugar

3 eggs

1/2 tsp vanilla powder (I would use extract if in the U.S.)

1 1/2 cups all purpose flour

1/2 tsp salt

2 tsps baking powder

1/2 cup vegetable oil

1 1/4 cup chopped fresh apricots (approx 6 large ones)

1 cup apricot jam 2 tbs water

Steps:

1. Pre-heat the oven to 350 degrees. Line a jumbo cupcake pan with cupcake liners. I had to use creme caramel disposable cups here for lack of a cupcake pan. They are a little larger than your standard cupcake mold so this recipe is geared more towards a jumbo cupcake pan. If using a regular cupcake pan, you might end up with a few more cupcakes and might also have to cut down a little on the cooking time. Chop up apricots and set aside.

 2. In a large bowl, whisk together the apricot yogurt, sugar, eggs and vanilla powder. Whisk the flour, baking powder and salt in all at once. Fold in the chopped apricots and vegetable oil until all mixed.

3. Fill the jumbo cupcake molds about 3/4 of the way and bake in the oven for approximately 35 minutes or until they are dark golden and a toothpick inserted in the center comes out clean. Allow the cupcakes to cool for about 10 minutes.

4. While the cupcakes are cooling, stir 1 cup of apricot jam and 2 tbs of water together over medium heat. The glaze should be hot and slightly runny. When cupcakes have cooled a little, spoon a tbs or so of the apricot glaze so that the tops of the muffins are coated. Allow the glaze to cool and thicken a little on top. Enjoy!


Italian Style Strawberry Shortcake

by Catherine Down


I have been craving strawberry shortcake something fierce my friends.

Every year at the very beginning of July (and the very tail end of strawberry season), my family goes to a U-Pick strawberry farm in Rhode Island.

We pick an absurd amount of strawberries that are are so juicy and sunripened they are about to explode and thus must be consumed pretty much immediately. 

Their purpose, first and foremost, is to form the red stripes on an American flag cake. Inevitably, we end up having a surplus of strawberries and then we’re just forced to make strawberry butter, jam, or my personal favorite, strawberry shortcake.

Even though I’ve been desperate for some good old fashioned strawberry shortcake (with biscuit-none of this mid-atlantic pound cake nonsense), I saw a recipe for strawberry tiramisu in the NY Times and I knew it was just calling my name. Lady fingers soaked in sweet sparkling wine, creamy mascarpone whipped with vanilla and cream, crushed ripe strawberries? Check, check and check. After a quick jaunt to Piemonte for a weekend of wine tasting, I returned home with a delicious bottle of Moscato d’Asti to perfectly finish the dessert. Richer and more decadent (not to mention boozier) than traditional shortcake, I consider this to be an Italian style strawberry shortcake.

Italian Style Strawberry Shortcake

Marginally adapted from: http://www.nytimes.com/2010/06/02/dining/02appe.html?ref=dining

Ingredients:

3 small containers of strawberries (1 1/2 quarts strawberries in the U.S.)

1/3 cup +1 tablespoon superfine sugar, or more to taste (the original calls for confectioner’s sugar, but that apparently does not exist here in Italy)

1 bottle (750 milliliters) moscato d’asti wine (a sweet sparkling white wine), more for serving

1 kilo (2lbs) mascarpone

1/2 cup heavy cream

1 tsp. vanilla powder (would have used vanilla extract or beans if in the U.S.)

40 ladyfingers (1 large package)

Steps:

1. Hull and slice 2/3 of the strawberries. Leave remaining whole for garnishing the top.  Put sliced berries in a bowl and gently toss with 1 tbs superfine sugar, adding more if berries are very tart. Add a splash of moscato to bowl and let sit for 15 minutes.

2. Meanwhile in a large mixing bowl, whisk together mascarpone, heavy cream and 1/3 cup superfine sugar. Add the tsp of vanilla powder to the mascarpone mixture. Lightly whisk until soft peaks form.

3. Pour some moscato into a shallow bowl. Dip the ladyfingers into the wine for a few seconds to absorb wine, turn and dip again. Use as many of them as fit to line a 9- by 13-inch baking dish (or other 2-quart casserole) in one layer. Refill the bowl with moscato as needed.

4. Spread half of mascarpone mixture onto ladyfingers. Spoon strawberries and juices on top of mascarpone in an even layer.

5. Dip more ladyfingers and arrange on top of berries in an even layer. Top with remaining mascarpone mixture and smooth the top. Garnish with the remaining strawberries. Cover and refrigerate the “shortcake” for at least 6 hours and for up to 2 days. I made mine at 9 pm and served it the next afternoon. Melissa Clark recommends drizzling the cake with a little more moscato right before serving for some extra pizzazz


Al Fresco Asparagus Pasta

by Catherine Down


It has gotten hot, hot, hot here in rural Italy. My home has gotten a trifle warm, stifling might really be the best adjective, and this pasta dish is a direct result of wanting to spend as little time as possible near a scorching stove or oven. The sauce requires no cooking, just some good old fashioned fork mashing and it involves very few utensils (a bonus for the dishwasherless like myself). In order to beat the heat, Lauren and I moved our dining room table out to the balcony and invited a few friends over for some al fresco feasting.

Be sure to serve with a little candlelight, a lemon cocktail (limoncello, gin, fresh lemon juice and all natural lemon soda with fresh thyme as garnish), good company, and 40,000 vicious tiger mosquitoes.

Asparagus, Lemon, Shallot, Basil Goat Cheese Pasta

Ingredients:

(Serves 4 main course portions, 6 first course portions)

1 8-10 oz. log of goat cheese (I meant to buy a log of fresh, tart goat cheese but accidentally bought a log of aged goat cheese with a white rind. I cut the rind off and used it anyway. It wasn’t the exact flavor I was looking for but still pretty tasty.)

1 large shallot (or 2 small ones)

25 basil leaves

2 tbs extra virgin olive oil

2 bunches of asparagus

9 oz of pasta- I used trine, a long tagliatelle type pasta with curly edges, but use whatever shape you prefer

juice of 1 large lemon

2 pinches of salt plus more for pasta water

Parmigiano-Reggiano (for grating on top)

Steps:

1. Remove goat cheese from fridge and let sit on countertop for 30 minutes to soften up a little bit. Put into a large bowl.

2. Finely mince the shallot and mash it into the goat cheese with a fork until well mixed.

3. Finely chop the basil leaves and mash into the goat cheese shallot mixture.

4. Juice 1 large lemon, put 2 tbs olive oil and the lemon juice into the cheese mixture. Mash with a fork until all the ingredients are melded together. Add salt to taste (I used about 2 large pinches). It should look like picture below. Cover in plastic wrap and let sit in the fridge for at least an hour and even overnight so that the flavors have time to meld together.

5. Remove the tough, woody ends from the asparagus. This can be accomplished simply by grabbing the end of the stalk, bend the spear and snap it where it breaks naturally. Cut the asparagus into approximately 1 inch pieces. Set aside.

6. Remove the cheese sauce from the fridge. Put a large pot of water on to boil, add salt, and when water is boiling add the pasta.  Be sure to look at the package instructions and note how long the pasta should cook for. Approximately 4 minutes before the pasta is finished cooking, toss the asparagus pieces into the boiling water with the pasta. Let asparagus and pasta continue to cook until pasta is al dente (firm to the tooth) and the asparagus is tender but still slightly crisp. Drain the pasta.

7. While pasta is still piping hot, immediately put it into the large bowl with the cheese mixture. Stir until the cheese sauce has totally coated the pasta. Grate fresh parmigiano-reggiano on top and serve.

Note: Al fresco dining is only pleasant if your guests do not feel compelled to wear woolen hats, sweatshirts, and socks pulled up over their pants in the middle of sweltering June heat in order to combat mosquitoes. Feel free to serve this pasta indoors as well.


Gnocchi Croutons

by Catherine Down


While in the midst of writing a paper on bergamot oranges, I needed a quick lunch break and I wanted something hearty and filling but also something that I could at least pretend was good for me. My compromise? Butter Fried gnocchi, but you know, with salad. So it’s healthy. Best of both worlds.

Not to get all Semi-Homemade with Sandra Lee on you, but the recipe is basically as follows: Storebought Gnocchi+Jarred Tapenade+Prewashed and Cut Greens+Parmigiano-Reggiano= Super Easy and Fast Lunch.  I know I go to Slow Food U and this breaks all the rules, but sometimes even slow foodies need to take shortcuts.

Gnocchi Croutons with Salad

(Serves 1 hungry, time crunched student)

Ingredients:

½ cup storebought gnocchi

2 cloves garlic

½ tsp butter

Salt and pepper to taste

Lettuce

Salad dressing (or in absence you can do as I did and simply stir a tsp of black olive tapenade)

Steps:

1. Wash and dry a large handful of lettuce and place in bowl. Set aside.

2. Melt ½ tsp of butter in frying pan over medium-low heat.

3. Peel two cloves of garlic and place in the sizzling butter. When the butter is  a light brown color and garlic is somewhat cooked, put in ½ cup of gnocchi. 

4. Allow to sit in pan for a minute or so so that the gnocchi develops a bit of a crunchy brown crust. Stir the gnocchi so they are browned somewhat evenly on all sides. I like to taste one in order to make sure the gnocchi are heated all the way through. Season the gnocchi with salt and pepper to taste.

5. While gnocchi are cooking, dress your salad greens with your favorite vinaigrette or you can do as I did and simply stir a teaspoon of black olive tapenade into the lettuce.

6. Discard garlic, and pour the warm gnocchi on top of the dressed greens, grate parmesan cheese on top of salad. Enjoy!